DIY Project || #13 || Clear Gemstone Necklace

Tuesday, February 26


INGREDIENTS YOU'LL NEED:

DIY gemstone clear necklace

-thick plastic
-large, colorful gemstones
-hot glue gun
-cord or chain
-scissors
-paper

INSTRUCTIONS:

DIY gemstone clear necklace

DIY gemstone clear necklace

DIY gemstone clear necklace

DIY gemstone clear necklace

DIY gemstone clear necklace


I made this project in less than thirty minutes when I was about to head out for a small birthday dinner a couple weeks ago. I was inspired by the Kate Spade version of the plastic/gemstone necklace, like this one here, yet didn't think it worthy enough of hundreds of dollars (I mean..it is made of plastic). So I whipped up this necklace using a thick plastic bag container I had in my room originally used as packaging for bedsheets I believe. I purchased a (seriously) massive bag of large, colorful gemstones, which is a delight in and of itself, from Blick's in Central Square. I wish I could have used a nicer cord for the neck band, however, I only had this hemp-like thread on hand. You should try using a gold or silver chain, or perhaps a black band to bump up the elegance of it all. Ah well, I just hope you get inspired!


FRIDAY FAVES || #10 || PATTERN ME UP!

Friday, February 22

one | two | three | four

GRADUATION COUNTDOWN BUCKET LIST || NEW FEATURE

Thursday, February 21


Just yesterday I saw an email posted by a fellow classmate. The subject title: "99 days until graduation." Immediately after seeing it I began to seriously consider how I've spent my time at Harvard -- what I've learned, what I've forgotten, what I missed out on, what I truly loved, and how in the world I actually ended up where I am today (alive and sane). As if right on schedule, once the countdown has begun and the days are seemingly waring thin, the desires to savor and relish and love and appreciate all start to kick in and knock out any remaining practical sense we've been hanging onto. To be honest -- I've waited until the last moments to truly explore the place where I have been living, studying, and procrastinating over the past four years. And I don't mind. Or at least, I've accepted that fact and moved on. I'm not trying to 'make up for lost time and opportunities.' I'll never be a freshman again, never go to that concert that took place two years ago, never run naked in the Yard before winter finals (okay...that still might happen in another context). For now, I'm preparing to begin. To begin looking for new chances, to be more aware of what's around, to experience, and acknowledge. And with that swoosh of philosophical hipster jargon nonsense, I've decided to start listing 99 things that I want to try during the course of the remaining 99 days I have left. I won't do one item every day. I may not reach 'em all. Yet, somehow making this public pushes me to accomplish at least one major thing this semester (#senioritisproblems). I don't really know what this will look like, but I'm ready to document and detail stories for you and for myself. Check in every week to see how I'm surviving the countdown!

In the meantime, anybody have ideas/places/activities I should explore? Send a note in the comment box :)


DIY Project || #12 || Origami Paper Envelopes

Tuesday, February 19


I recently made a trip to Blick's Art Materials in Cambridge after visiting friends in Central Square and happened upon these beautiful origami paper bundles. I am by no means an origami expert so I tried to find a 'beginner's 101' DIY project to using them in your everyday life. I decided on making these gift envelopes which can be tailored based on the size of what you wish to place inside (i.e. small gift card vs. birthday card). I simply just love the vibrant patterns of the paper and think anyone else would love it too! Let me know what you think in the comment box below!

INGREDIENTS YOU'LL NEED:

STEP-BY-STEP INSTRUCTIONS:


It's so easy to make a bunch of these and grab 'em when you need a last minute gift package. I tied some with a natural twine string, but you could easily use ribbon, bows, stickers, or whatever you please. Let me know what you think below, and share via the "love it" button!

FRIDAY FAVES || #9 || LIKE SNOW

Friday, February 15

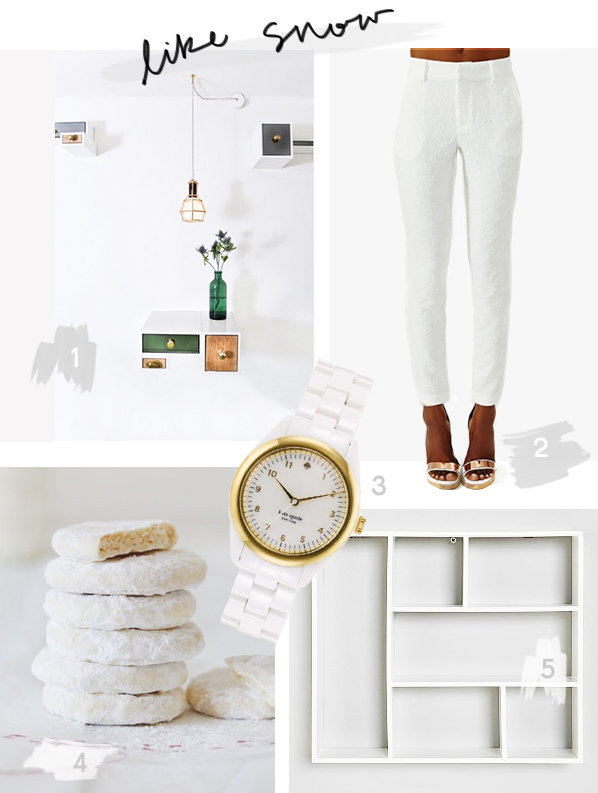
white as snow from fashion to food to decor
After the Blizzard storm (Nemo) blew through Boston and Cambridge, it has literally been the whitest I have seen winter. With snow piled up sometimes taller than myself (okay, I'm not that tall...but still...), I was inspired by the magnificent forces of nature for this friday's faves, which all remind me of that wonderfully annoying while pleasantly sloshy thing called snow.

one | two | three | four | five


VISUAL DELIGHT || #3 || HAPPY VALENTINE'S DAY!

Thursday, February 14


DIY Project || #11 || Turn a Placemat into a Purse

Tuesday, February 12

turn a table placemat into a purse

turn a table placemat into a purse
I am so excited to share with you all this quick and easy sewing DIY project. Over the summer of 2010, I had spent eight weeks living and working in La Paz, Bolivia where I bought these gorgeous, colorful placemats in a street market. Thinking I would give them as gifts to friends and family upon return, I fell in love with their vibrant colors and mixed textures -- and of course I wanted to carry this fabulous decor everywhere. Luckily my family only uses a few of them so I took an extra and turned it into a large clutch bag. A fun idea to spice up your dark colored winter wear, let me know what you think!

INGREDIENTS YOU'LL NEED:


turn a table placemat into a large clutch purse


INSTRUCTIONS:

STEP ONE: Fold the placemat in half, then begin pinning one end onto the top of the zipper.
turn a table placemat into a large clutch purse
STEP TWO: Taking the other end of the placemat, pin it to the other arm of the zipper. Try opening and closing the zipper to ensure that the placemat does not inhibit the zipper in any way.

DIY turn a table placemat into a large clutch purse


STEP THREE: Sew the edges onto the zipper.
STEP FOUR: Next, turn the bag inside out.

DIY turn a table placemat into a large clutch purse

STEP FIVE: Sew the right side of the bag (where the zipper ends). Repeat to the left side of the bag. If the zipper is longer than the length of the bag, make sure the zipper piece you pull is located inside the area you sew.
STEP SIX: Trim the edges on the sides of the bag for a clean seam inside.

DIY turn a table placemat into a large clutch purse

STEP SEVEN and EIGHT: Turn the bag right-side-out and lightly iron the zipper along the inside of the bag and then along the outer surface for a crisp look.

THE FINAL LOOK:

DIY turn a table placemat into a large clutch purse


DESIGN WORK || #3 || I LIKE FALL SPRING PROMO PHOTOSHOOT

Monday, February 11

I Like Fall Spring Promotional Photo Shoot

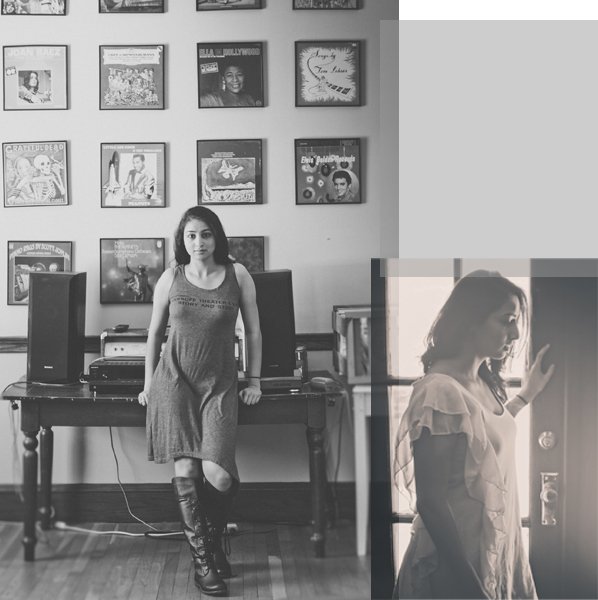
I had the pleasure this week of photographing the promotional fashion shoot for I Like Fall's upcoming spring release! I was delighted when Preetha, a fellow Harvardian and friend, offered up to model for me. She has such a poignant quality that is both stirring yet soft (and she's had quite the social media explosion after the pictures were posted on Facebook!). Here are some of my many favorite shots from the shoot, and you can click here to see a sneak peek of the spring lookbook on I Like Fall's site. If you're in the Boston/Cambridge area, join I Like Fall on Wednesday, February 13th at 5pm at the launch event hosted by Free People in Harvard Square! 

I Like Fall Spring Promotional Photo Shoot

I Like Fall Spring Promotional Photo Shoot

FRIDAY FAVES || #8 || COZY IN LOVE

Friday, February 8

With Valentine's Day coming in less than a week, here are some of my favorite picks to celebrate the day with friends, family, and those special someones. And that's of course the best part about Valentine's day...all those people GIVE YOU CHOCOLATE. Enjoy!  

source 1 | source 2 | source 3 | source 4 |


DIY PROJECT || #10 || TEA BAG HEART VALENTINES

Tuesday, February 5

diy valentine's day tea bags

I love tea. I can (and typically do) drink it every day. Chai, Earl Gray, Peppermint, Black Vanilla...the list goes on and on. Given that tea drinking is such a sophisticated and 'adulty' thing to do, I wanted a Valentine's day idea that would be great for all my other tea-drinking-adulty friends. Below is a tutorial on how to make tea bag heart valentines from a free downloadable template I made that can be printed out on a regular sheet of paper. Each of the valentine hearts has a little message like "Love ya!", "Kiss me?", and "You rock!" so you can sweeten the tea for anyone, and everyone, in your life. Hope you enjoy it! And spread the love via Facebook, Pinterest, Twitter, or any of the other thousand social media outlets!

diy valentine's day tea bags


diy valentine's day tea bags
INGREDIENTS:
free downloadable print out
(click here)
tea bags
scissors
pin
stapler

INSTRUCTIONS:

diy valentine's day tea bags


Step one: Begin by pulling off the original tea bag tag (mine was Twinings).
Step two: Using your scissors, snip off the knot at the end of the string.

diy valentine's day tea bags


Step three: After printing out the free heart & gift bag template, begin cutting out the hearts.
Step four: Take one heart and, using a sewing pin or needle, poke two holes next to each other. Using the pin, gently rip the tiny space between them so that the two holes become a single larger one.

diy valentines day tea bags


Step five: Next, slide the thread of the tea bag into the hole in the heart.
Step six: Tie a knot at the very end and slide the heart tag back down the thread so that it hangs on the end like the original tea bag tag.

OPTIONAL: TEA BAG COVERS

diy valentine's day tea bags


Step seven: Cut out the tea bag cover rectangles from the template, leaving some white spaced borders across all edges. Fold the rectangle in half where the darker and lighter colors meet.
Step eight: Depending on the size of your tea bag (I recommend the smaller ones!), gently tuck the tea bag inside the folded cover and staple the top so that it will stay snugly inside.

valentine's day tea bags

THE FINAL LOOK:


free download valentine's day tea bag hearts

(fits perfectly on regular 8.5" x 11" printer paper)

TRAVEL DELIGHT || #2 || OCEANSIDE FAIRGROUNDS

Sunday, February 3

While back at home over the January winter break, my family and I visited the Oceanside Fair for the first time. It is hosted every Thursday night from 5 to 9pm on an open boulevard just a block or two from the ocean and main pier. I have always been in love with fairs of the variety since I was a kid. Street fairs, carnivals, block parties, craft markets -- love 'em all. Here are a few pictures from our most recent visit. Some interesting things I discovered: people can make wooden roses that smell divine, funnel cake is maybe one of the most delicious and nutrient deficient foods on earth, I have never tried Afghan food which is now on my list of things to do, and California (again) is the best place on earth. 

oceanside fair
oceanside fair

funnel cake

oceanside fair
driving home bokeh


PINSPIRATION || #2 || DOTTED

Friday, February 1


source 1 | source 2 | source 3 | source 4 | source 5

DESIGN DELIGHT || #2 || THE MONTH OF LOVE


People! It's February! The month of Valentine, of hugs and kisses, of tacky department store decorations, and the only time the color pink is a favorite for everyone (maybe). Keep tuned for some wonderful Valentine's day inspired photography, DIY projects, and posts this month. Especially for my fellow peers out there in the struggle, this Valentine's day is going to be budget friendly (and by budget friendly I mean under $20. Okay, that's ridiculous, right? Right. I meant under $10, lol). So grab a friend, a lover, a secret admirer (though don't actually grab that one because you might get arrested for stalking and harassment) and start celebrating love! Translation: eat plenty of chocolate...all day, everyday.